How to make github action build your Unity Project
How to make github action build your Unity Project
CI and CD are an important part of a project. With Github Actions you cann build a pipeline to build, test and deploy your project. Using Unitiy is no different. You can still automate those part of the project to make de deploy and the development process more easy and with quality assurence.
How to create a Github Action
You need to add a folder to the root of your project called .github/ and inside that folder add another one called workflows/. Inside workflows/ folder you can add your actions in .yml extension.
Example:
name: dotnet build

on: [push]

jobs:
  build:

    runs-on: ubuntu-latest
    strategy:
      matrix:
        dotnet-version: ['5.0.x']

    steps:
      - uses: actions/checkout@v2
      - name: Setup .NET Core SDK $
        uses: actions/setup-dotnet@v1.7.2
        with:
          dotnet-version: $
      - name: Install dependencies
        run: dotnet restore src/MangaDexWrapper
      - name: Build
        run: dotnet build src/MangaDexWrapper
      - name: Test
        run: dotnet test src/MangaDexWrapper.Test
This is an example of an Action to build your .NET Core project. This action will build your project everytime you add a commit to your Github Repository.
Creating an Action to Build your Unity Project
To build your project using Github Actions, you need to first to configurate a license to use in the build process.
How to get a License
Add the current script to an activate.yml file inside the workflows/ folder.
name: Acquire activation file
on:
  workflow_dispatch: {}
jobs:
  activation:
    name: Request manual activation file 🔑
    runs-on: ubuntu-latest
    steps:
      # Request manual activation file
      - name: Request manual activation file
        id: getManualLicenseFile
        uses: game-ci/unity-request-activation-file@v2
      # Upload artifact (Unity_v20XX.X.XXXX.alf)
      - name: Expose as artifact
        uses: actions/upload-artifact@v2
        with:
          name: $
          path: $
Commit this file and go inside Actions tab in your repository and click in the “Acquire activation file” tab.
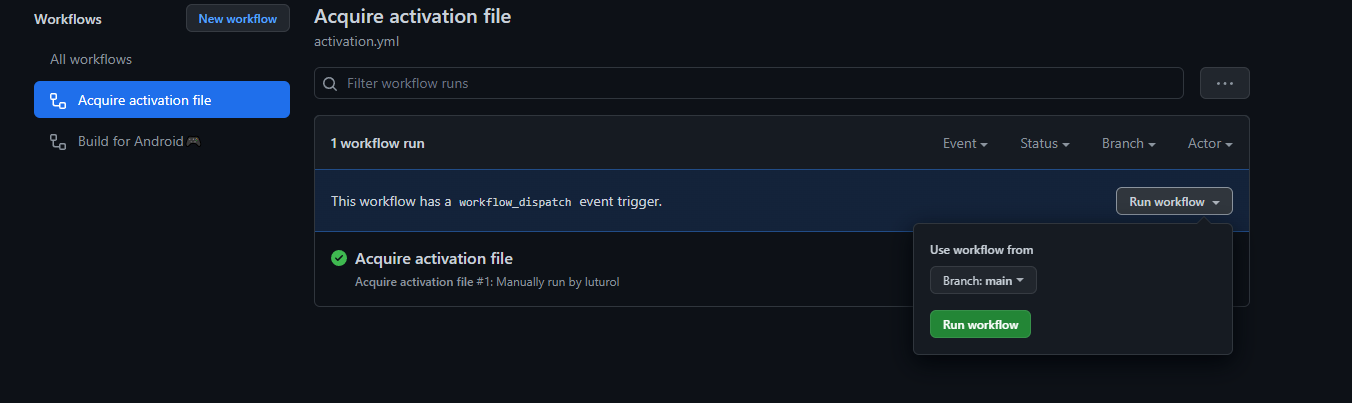
Click in the Run workflow to execute the action. This action will only run when you manually activate it.
After that, click in the process after it has finished and download the license. It will be a file with Unity_vSOMEVERSION.alf name.
Now you need to register this lincese into Unity to download the correct license.
Go to unity license web page and import the .alf file to it to download the correct one.
Add License file to Github Secrets
In your Github Repository page to Settings -> Secrets -> Actions and add a New repository secret. Copy and Paste the content of the new License you downloaded from Unity License Page, add a name to the secret (I recomend using UNITY_LICENSE because it will be used in the build file) and Save.
This is the license we will use to build our project in the build action.
You can also check this documentation to learn more about the get a license step.
Creating Build Action
You need to create another file called main.yml inside this file we will add a script to be the Action for build our project.
You can configure the action to be executed every commit, specific branch or only on pull requests. Change on property value to configure.
name: Build 🎮

on: push
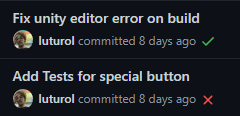
If the action builds with success it will appear a green sign on your commit. If don’t, will appear a red x sign on your commit hash.
Adding environment properties
You may have a license error if you don’t configure your credentials to validate your license in the build.
It will may return the following error:
2022-07-05T17:07:08.8756955Z Requesting activation (personal license)
2022-07-05T17:07:10.6482359Z Unclassified error occured while trying to activate license.
2022-07-05T17:07:10.6482654Z Exit code was: 1
2022-07-05T17:07:10.7705719Z ##[error]The process '/usr/bin/docker' failed with exit code 1
To solve this issue, you need to add your e-mail and password used to logon on Unity License Page so it can Validate your License.
Add another two Secrets to your project: UNITY_EMAIL and UNITY_PASSWORD
You need to set environments properties configurations such as e-mail, password and licese:
env:
  UNITY_LICENSE: $
  UNITY_EMAIL: $
  UNITY_PASSWORD: $
Adding build job
Now you need to add a job for your action.
  buildAndroid:
    name: Build for Android 📱
    runs-on: ubuntu-latest
    strategy:
      fail-fast: false
      matrix:
        targetPlatform:
          - Android # Build an Android .apk standalone app.
    steps:
      - uses: actions/checkout@v2
        with:
          fetch-depth: 0
          lfs: true
      - uses: actions/cache@v2
        with:
          path: Library
          key: Library-$
          restore-keys: Library-
      - name: Build
        uses: game-ci/unity-builder@v2
        with:
          targetPlatform: $
      - name: Upload Artifact
        uses: actions/upload-artifact@v2
        with:
          name: Build-$
          path: build/$
      # Return License
      - name: Unity - Return License
        uses: game-ci/unity-return-license@v2.0.0
This script will build your application and after it succeed will upload the build file into your Action so you can download. The script is configured to build for Android, but you can change that by modifying the targetPlatform property and setting to build you want.
You can check targetPlatform list values by clicking here.
The whole file will probably look like this:
name: Build for Android🎮

on: push

env:
  UNITY_LICENSE: $
  UNITY_EMAIL: $
  UNITY_PASSWORD: $

jobs:
  buildAndroid:
    name: Build for Android 📱
    runs-on: ubuntu-latest
    strategy:
      fail-fast: false
      matrix:
        targetPlatform:
          - Android # Build an Android .apk standalone app.
    steps:
      - uses: actions/checkout@v2
        with:
          fetch-depth: 0
          lfs: true
      - uses: actions/cache@v2
        with:
          path: Library
          key: Library-$
          restore-keys: Library-
      - name: Build
        uses: game-ci/unity-builder@v2
        with:
          targetPlatform: $
      - name: Upload Artifact
        uses: actions/upload-artifact@v2
        with:
          name: Build-$
          path: build/$
      # Return License
      - name: Unity - Return License
        uses: game-ci/unity-return-license@v2.0.0
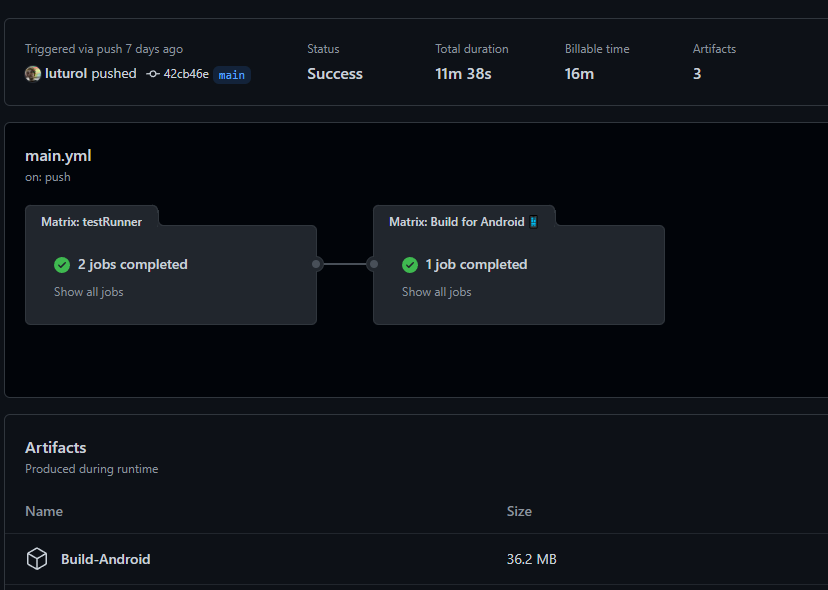
Save the file and commit to your project. It will automaticaly run and you get the status after that.
Downloading your build
Go to Actions -> open the action that was created by your commit -> On Artifact section will appear the zip file to be downloaded.
More documentation
You can also check this documentation to learn more about the build step.
Conclusion
Using Game CI to build your project and deploy will save you time, won’t blocking development on your team and you will always have a build to show and test. You, also, will have a build for every new feature you made and can configure to block PRs to be merged if the build is broken so you don’t deliver something that won’t work.